For a first acrylic painting, choose a small surface, a few colors, and a subject you can break into broad shapes. A sky, distant hills, and a dark foreground make a useful starting exercise: you can practice coverage and layering without drawing a detailed object.
The project below uses separate, dry layers. You won’t need to blend a flawless sunset or paint individual leaves. If you already have materials, use them. If you’re starting from nothing, the beginner supplies checklist explains what earns a place on the table.
Before you start
- Use a surface sold as suitable for acrylic painting.
- Put out small amounts of paint and keep unused paint closed.
- Let each large area dry before adding a contrasting shape over it.
- Clean the brush before acrylic dries in its bristles.
What makes acrylic different?
Water-based acrylic contains pigment in an acrylic polymer emulsion. As water leaves the paint, the binder forms a film. Wet paint can be cleaned with water; a dried acrylic film doesn’t behave like watercolor that you can simply rewet. Liquitex explains this drying process.
That gives you a practical choice. Work into wet paint to merge colors, or wait for it to dry to put a separate shape on top. For this first picture, choose the second approach. You have fewer moving parts to manage.
There isn’t a single drying time for every acrylic painting. Paint range and thickness matter. Check the product guidance and test a spare dab alongside the picture rather than relying on a timer. Winsor & Newton gives different examples for its Galeria and Professional acrylic ranges.
Set out a compact painting kit
For this exercise, use:
- One small acrylic-paper sheet or pre-primed canvas panel. An 8 × 10 inch surface is a suggested working size, not a requirement.
- Acrylic white, blue, yellow, and a red or magenta.
- A flat synthetic brush for broad shapes and a round brush for smaller marks.
- A palette, water containers, a rag, and protection for the table.
- A scrap of the same surface for trying mixtures.
You can add a ready-made dark color if you have one. No need to replace your paint to match a list precisely. A cooler blue and a warmer blue produce different mixtures; the purpose is to see what your own colors do.
Keep food and drink apart from the painting area, read the paint labels, and use a clearly marked container for paint waste. Liquitex’s studio guidance covers handling and cleanup. Water-based doesn’t mean the paint belongs in drinking cups or down a drain.
Paint a landscape in separate layers
1. Sketch only the divisions you need
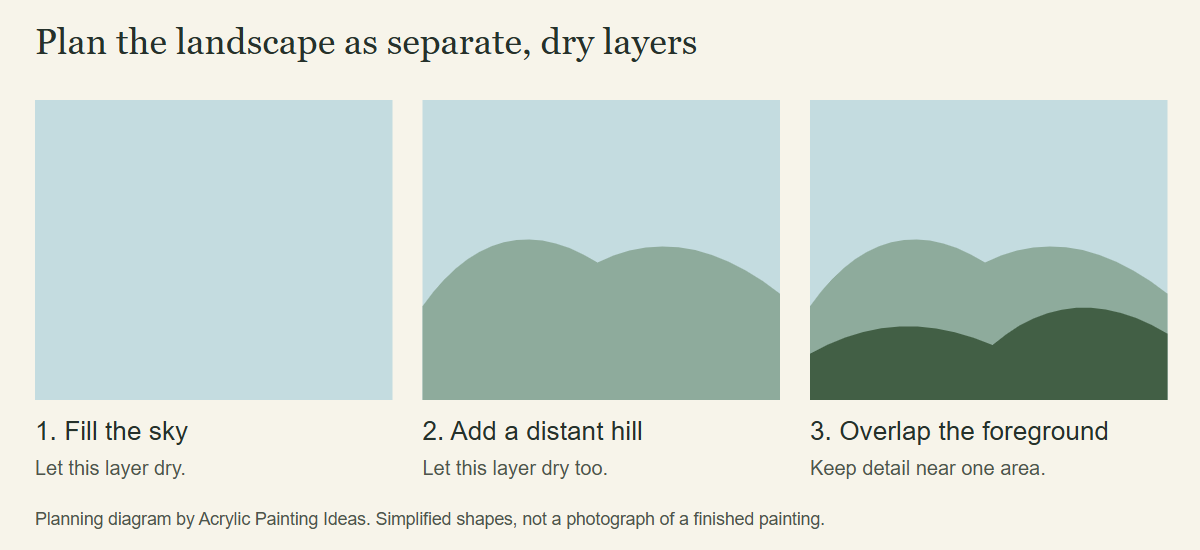
Turn the surface horizontally. Lightly mark a horizon below the middle. Draw one shallow hill line behind it and a larger, uneven foreground shape near the bottom. Leave the sky as the biggest area.
Skip houses, trees, and tiny clouds for now. Before painting, you should be able to point to every shape you intend to fill. If the drawing already feels crowded, erase a shape.
2. Mix a sky color on the palette
Put white on the palette and add blue a little at a time. Make a stroke on your scrap. If the mixture is darker than you want, bring some of it into a fresh patch of white instead of continually expanding the original puddle.
Paint the sky with your flat brush. Use overlapping strokes and aim for an even area. A flat sky is deliberate here; you can practice a soft acrylic blend on another painting.
If the brush leaves dry, broken trails, check whether it needs more paint before adding water. If you do need a thinner consistency, follow the paint manufacturer’s directions. Our thinning guide explains why a universal water recipe is unreliable.
3. Wait, then add the distant hills
Let the sky dry before touching it with the next color. Mix a blue-green using your blue and yellow, then bring a little into white. Test it beside the sky sample. The hill should be visibly different from the sky without becoming the darkest shape in the picture.
Fill the distant hill in one broad silhouette. Use the edge of the flat brush to place the top line, then fill beneath it. You don’t need a smooth, mechanically perfect curve.
4. Make a darker foreground
Mix another green with less white. To adjust it, put a small amount in a separate palette space and test additions there. A trace of red or magenta is one option to explore, but the result depends on the actual pigments. Keep a sample of the unaltered mixture so you can compare.
Once the hill layer is dry, paint the foreground. Make its top edge irregular. Let it cover part of the distant hill: that overlap is the main depth cue in this simplified composition.
5. Add a few marks and stop
With the round brush, add a small cluster of short grass strokes near one corner. Place a lighter green patch beside them if the foreground needs variation. Keep most of the surface quiet.
Stand the picture upright and look from across the room. Can you still separate sky, hill, and foreground? If you can, the exercise has done its job. Extra detail is optional.
Fix the problem you actually see
| What you see | What to try next |
|---|---|
| The lower color drags into the new layer | Stop and let the area dry before repainting it. |
| You can’t distinguish the hill from the sky | Test a lighter or darker hill mixture on scrap before changing the picture. |
| A brush leaves broken trails | Reload it and test a stroke; then assess consistency if needed. |
| Coverage looks uneven | Check the paint’s opacity label and try a separate dry layer. |
| The picture feels busy | Leave the remaining open areas alone. Repeat the exercise with fewer marks. |
Opacity differs between colors. Liquitex’s Basics guide explains the package symbols for opaque, semi-opaque, and transparent paint. A transparent color showing the layer beneath isn’t automatically faulty paint.
Clean up before choosing the next picture
Wipe spare paint from the brushes, wash them with suitable soap and water, reshape the bristles, and let them dry. Keep paint sludge and excess paint out of the sink, following local disposal rules. Use the full acrylic brush-cleaning routine if you’re unsure what to do with the rinse water.
For your next freehand painting, choose a different subject from these acrylic painting ideas, but keep the small surface and simple shapes. Changing one thing at a time makes your next decision easier to judge.
If you would prefer a printed design to follow, Artistry By Numbers’ beginner-friendly collection offers a different way to approach a painting. Acrylic Painting Ideas and Artistry By Numbers are both operated by OmniLearnConsultingCommerce LLC. A numbered design guides placement; it doesn’t replace practice in mixing and composing a freehand picture.
Opening image: Art supplies by Average Jane, CC BY 2.0. Resized and cropped. Shown as illustration, not as the result of this tutorial.