To blend acrylic paint, place adjacent colors while they are still workable, then soften the join with a clean, lightly loaded brush. Prepare a middle mixture before you begin. When the brush starts catching or lifting the surface, stop and let the paint dry rather than scrubbing the same edge.
Practice on a small scrap before trying an entire sky. Start with blue and white, or another color and white, so you can concentrate on the transition. You can explore more complicated color combinations after you can control a simple one.
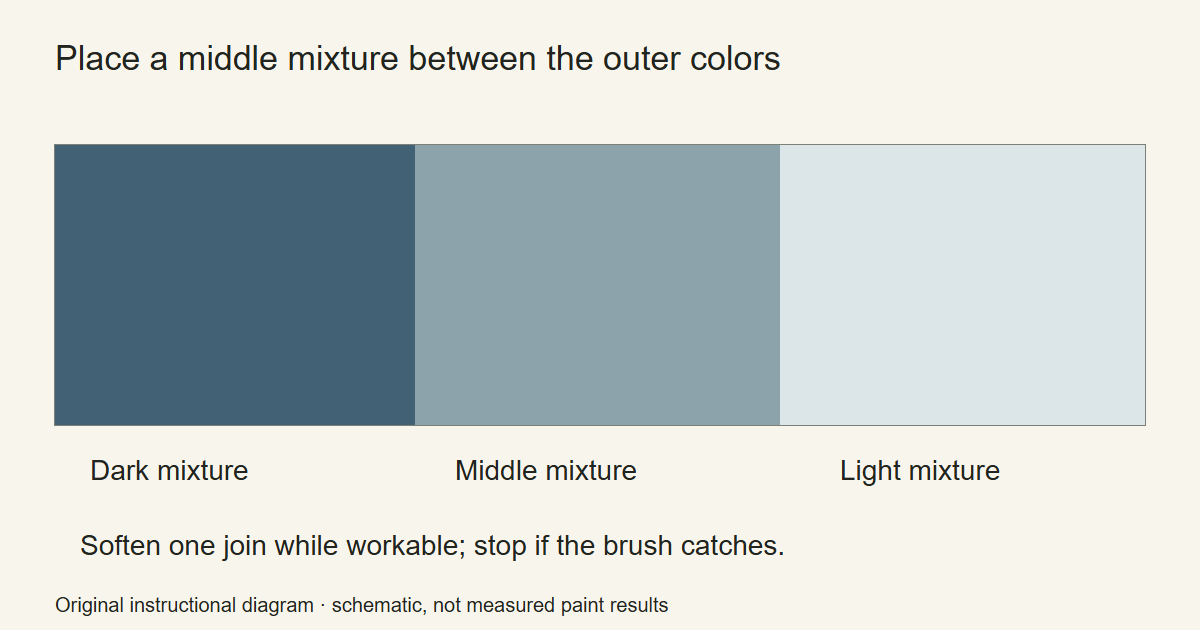
Set out the colors before touching the canvas
For this exercise, put out a dark mixture, a light mixture and a middle mixture made from the two. These are painting instructions, not a promise that equal quantities of any two paints will produce the same visual midpoint.
Keep a clean brush ready. A flat brush is a practical choice for a rectangular practice area. Choose one wide enough to work across that area without repeatedly tracing narrow stripes; the brush guide compares useful shapes.
Paint a short sample of each mixture. If one drags noticeably more than the others, adjust that portion first. Use the thinning guide to test flow without changing every mixture at once.
Build a transition in a small rectangle
Mark a practice rectangle on acrylic paper or a spare prepared canvas. Work in one direction so you can see the join you are trying to soften.
- Lay the darker mixture along one side.
- Place the middle mixture beside it, slightly overlapping the first area while it remains workable.
- Add the lighter mixture on the other side.
- Wipe excess color from the brush. Pass lightly across one join, then lift the brush away.
- Clean the brush before moving across the lighter join. Compare the result from a little farther away.
The prepared middle mixture gives you a transition to place intentionally. You do not have to manufacture every intermediate color by rubbing the two outer colors together on the canvas.
Keep the practice area small enough that you can place all the colors without rushing across a large surface. If the first strip is already drying before you reach the next one, reduce the area for the next attempt.
Stop when the surface starts resisting
A blend rarely improves through unlimited brushing. As soon as a stroke begins to catch, leaves a broken track or pulls up paint you wanted to keep, leave that section alone. Look at what the surface is doing rather than following a fixed minute count.
Canson explains that dry acrylic is not reworked with water like watercolor. Repeated wet brushing over a partly dried transition is a poor substitute for deciding whether to work wet or repaint after drying.
Keep the sample. Label the paint range, surface and brush. Make another beside it with a smaller working area. Comparing those two samples helps you decide whether the problem is the size of the task or the paint choice, without guessing from memory.
When more working time is useful
You can choose a paint or medium designed to stay workable longer. GOLDEN describes OPEN Slow-Drying Acrylics as suitable for softening and blending. That is a separate paint formulation, not a claim that all acrylic paint behaves the same way.
Liquitex Slow-Dri Medium is another product-specific option. It also increases transparency. Check the dry sample if your painting depends on an opaque passage.
Read the full label, including whether the product is a medium or an additive. The manufacturer’s Slow-Dri Fluid Additive directions describe limits that differ from those of its medium. Use the instructions for the exact bottle you own.
Repair a transition that has already dried
Treat a dry join as a new painting decision. You can paint a fresh band of the middle mixture over it, soften the new edges while they remain workable, and allow the surrounding dried color to stay in place.
If you choose a transparent glaze instead, you are changing how the underlayer reads through a new layer. That is a useful technique, but it is a different exercise from moving two wet colors into each other. Test the glaze on a scrap before covering a passage you like.
For the next practice, leave one edge crisp and soften another. A landscape does not need every boundary dissolved. A distinct horizon beside a soft sky can be more readable than one large blended field.
Try the blend in a painting
The acrylic sunset exercise uses a broad sky with a simple dark foreground, so there is a reason for the blend. Choose your transitions first and keep the silhouette for a later layer.
If you would rather practice brush control inside a prepared design, Artistry By Numbers has a beginner-friendly kit collection. Follow the design’s intended color boundaries unless you deliberately want to change them; a smooth blend is an option, not a requirement for every numbered area.
Acrylic Painting Ideas and Artistry By Numbers are owned by OmniLearnConsultingCommerce LLC. Links to Artistry By Numbers lead to our related painting business.
Illustrative image: Abstract 1.1 by Steve Snodgrass, CC BY 2.0. Cropped and resized. An existing artwork used as visual context, not a demonstration made for this guide.