
For a first acrylic sunset, keep the painting to a sky, a horizon and one dark foreground shape. Prepare the sky mixtures before you paint. Blend the joins while they remain workable, let that layer dry, then add the silhouette.
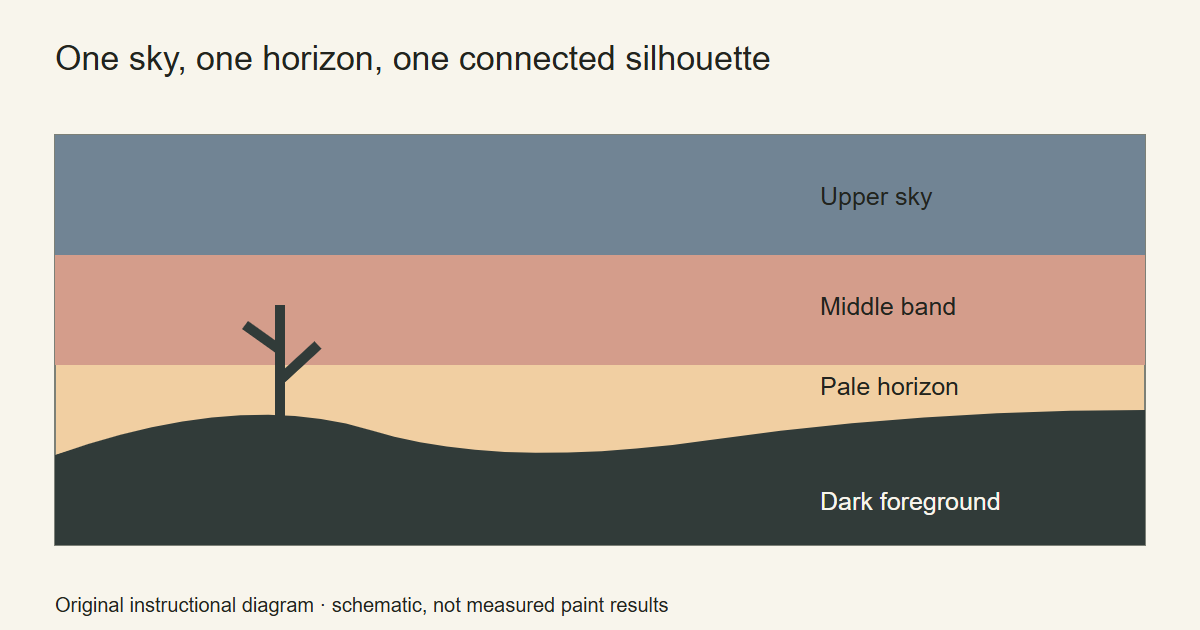
The exercise below is an original composition plan. The diagram shows where to place the main shapes; it is not a photograph of a tested painting or a guarantee of a particular result. Change the colors to suit the paints you own.
Choose a quiet composition
Draw a small rectangle on scrap paper. Place a horizon below the center, leaving more space for the sky than the foreground. Add a low bank, hill or shoreline. Keep one raised shape off to one side instead of scattering trees across the whole horizon.
This is a suggested composition for practice, not a rule about every sunset. The aim is to make the large shapes easy to read before adding details.
If you use a reference photograph, choose one you took or one with a license that permits your intended use. Look for the broad value pattern first: which area is lightest, and where is the darkest connected shape? GOLDEN’s color mixing guide distinguishes lightness and darkness, or value, from hue and intensity. Keep those decisions separate as you plan.
Put out a small palette
For this version, set out a blue, a red or magenta, a yellow and white. You do not need these exact pigments to follow the layout. Paint small dry samples first if a tube is unfamiliar.
Prepare a cool upper-sky mixture, a warmer middle mixture and a pale warm mixture for the horizon. Make the transitions on the palette rather than trying to invent the whole sky while it is drying. You can label the samples using the mixing chart exercise.
Use a broad flat brush for the sky and a smaller brush for the foreground. Canson’s brush shape guide describes how different heads serve washes, rounded contours and fine details. Match your brush to the size of the shape, not to an assumed universal brush number.
Paint the sky before the silhouette
Lightly mark the horizon. Keep the pencil line modest so it acts as a guide rather than a dark feature in the finished sky.
Lay the upper color across the canvas. Place the middle color below it, then the pale horizon mixture. Work the joins while the paint is still workable. Wipe or rinse the brush between distinctly different mixtures instead of carrying a heavy load of the upper color into the pale band.
Use light passes across a join, then lift the brush away and look at the painting. If the surface begins catching, stop. The blending exercise explains how to practice that decision on a small area before returning to a whole sky.
If you choose a slow-drying medium, follow its own instructions and test how it changes the color layer. Liquitex Slow-Dri Medium, for example, also increases transparency. It is a material choice to test, not an instruction to add an unspecified product to every paint.
Let the sky dry, then place one dark shape
Once the sky is dry, paint the low bank or hill as a connected mass. For this exercise, keep the color dark enough to read clearly against the pale part of the sky. Use your dry samples to judge that difference.
Make the outer contour uneven in a deliberate way. A low slope and one taller feature are enough. Fill the interior as a shape rather than drawing a row of separate grass blades.
If you want a tree, sketch its trunk and a few main branches first. Add only the branches that help the silhouette read. Pause before adding twigs: details are easier to add than to remove from a shape you have already made busy.
A water version: keep the reflections short
For a shoreline variation, leave some lower space for water rather than filling the foreground with land. Use short horizontal marks related to the light area in the sky. Leave breaks between them so the water remains a larger, quieter shape.
Do not try to mirror every cloud in a first attempt. Repeat the main light and dark arrangement and decide where to stop. This is a simplified exercise for practicing direction and spacing, not a physical model of reflection.
If something looks wrong
The sky has hard bands. Let the layer dry, mix an intermediate color and repaint a narrow transition. Practice the same join on a scrap first.
The horizon wanders. Check it from farther away. Re-establish the line with a deliberate stroke using the appropriate sky or foreground mixture; avoid repeatedly tracing it with a tiny brush.
The silhouette dominates. Cover a spare paper cutout with a dark color and hold it near the painting to compare a lower contour before repainting. That gives you a composition test without immediately adding more paint.
If the scene appeals to you but you prefer a prepared drawing, the landscape paint by numbers collection at Artistry By Numbers offers a related route. For your next freehand canvas, choose one different feature from the acrylic painting ideas guide while keeping the rest of this layout simple.
Acrylic Painting Ideas and Artistry By Numbers are owned by OmniLearnConsultingCommerce LLC. Links to Artistry By Numbers lead to our related painting business.
Illustrative image: Acrylic Potomac Sunset by Bold Frontiers, CC BY 2.0. Cropped and resized. Acrylic Potomac Sunset by Bold Frontiers, an example for observation. The tutorial uses its own simplified composition plan.